For program version 2.4.1
1. Introduction
Patroneo (which is Esperanto for "Pattern") is an easy to use, pattern based midi sequencer, a program that sends digital "notes" to software instruments such as synthesizers and samplers.
This program is feature-complete with version 2.4.1 in 2022. Further releases will be limited to maintenance and fixing problems.
Patroneo was initially designed for educational purposes, where the main goal is to teach the importance of patterns and repetitions in any kind of music. However, Patroneo is a full sequencer you can use to create real music. The constraints it presents will more likely boost your creativity than suppressing it.
You have tracks with one pattern each. Turn on steps in the pattern to play musical notes. Switch the patterns on and off in a sequence to create a song structure. Connect external synthesizers and samplers to create sounds.
1.1. Quick Start
To get to know the most important functions and workflows, this video tutorial series has been created.
Or as Youtube Mirror
1.2. Basic Principles
Patroneo organizes its music in tracks that contain measures. All measures of a track play the same "pattern" that creates music through a sequence of "steps".
The track is connected to an instrument through JACK, so Patroneo itself does not produce any sounds.
If you press Play, the track plays back from left to right. Whenever a measure is highlighted in the Form Editor, the pattern is played.
If you want to hear different patterns from the same instrument, you create several tracks for the same JACK instrument.
The selection of the tones per pattern is freely selectable. You can use normal musical scales or set any tones in any order. If you change the scale later, the pattern sounds different without having to switch tones on and off again.
Saving and loading your project is done by the New Session Manager (Agordejo). There you will find a "Save" button.
1.3. Keyboard Controls
In principle, Patroneo can be operated with the mouse. The keyboard is needed for only a few functions, such as changing track names or setting half-tone transposition. However, the keyboard makes some workflows faster and more convenient.
-
Space: Start and pause playback
-
L: Play the current measure as a loop
-
Home: Set playback to the beginning of the track.
-
For more shortcuts please check the Edit menu
2. Description of the graphical user interface and its functions
Patroneo consists of three parts: The Toolbar, the Form Editor, and the Pattern Editor. Between form- and pattern editor there is a Handle which you can grab with the left mouse button and move it up or down to give more space to one or the other area.
2.1. Toolbar
The Toolbar combines various commands with properties of the entire piece.
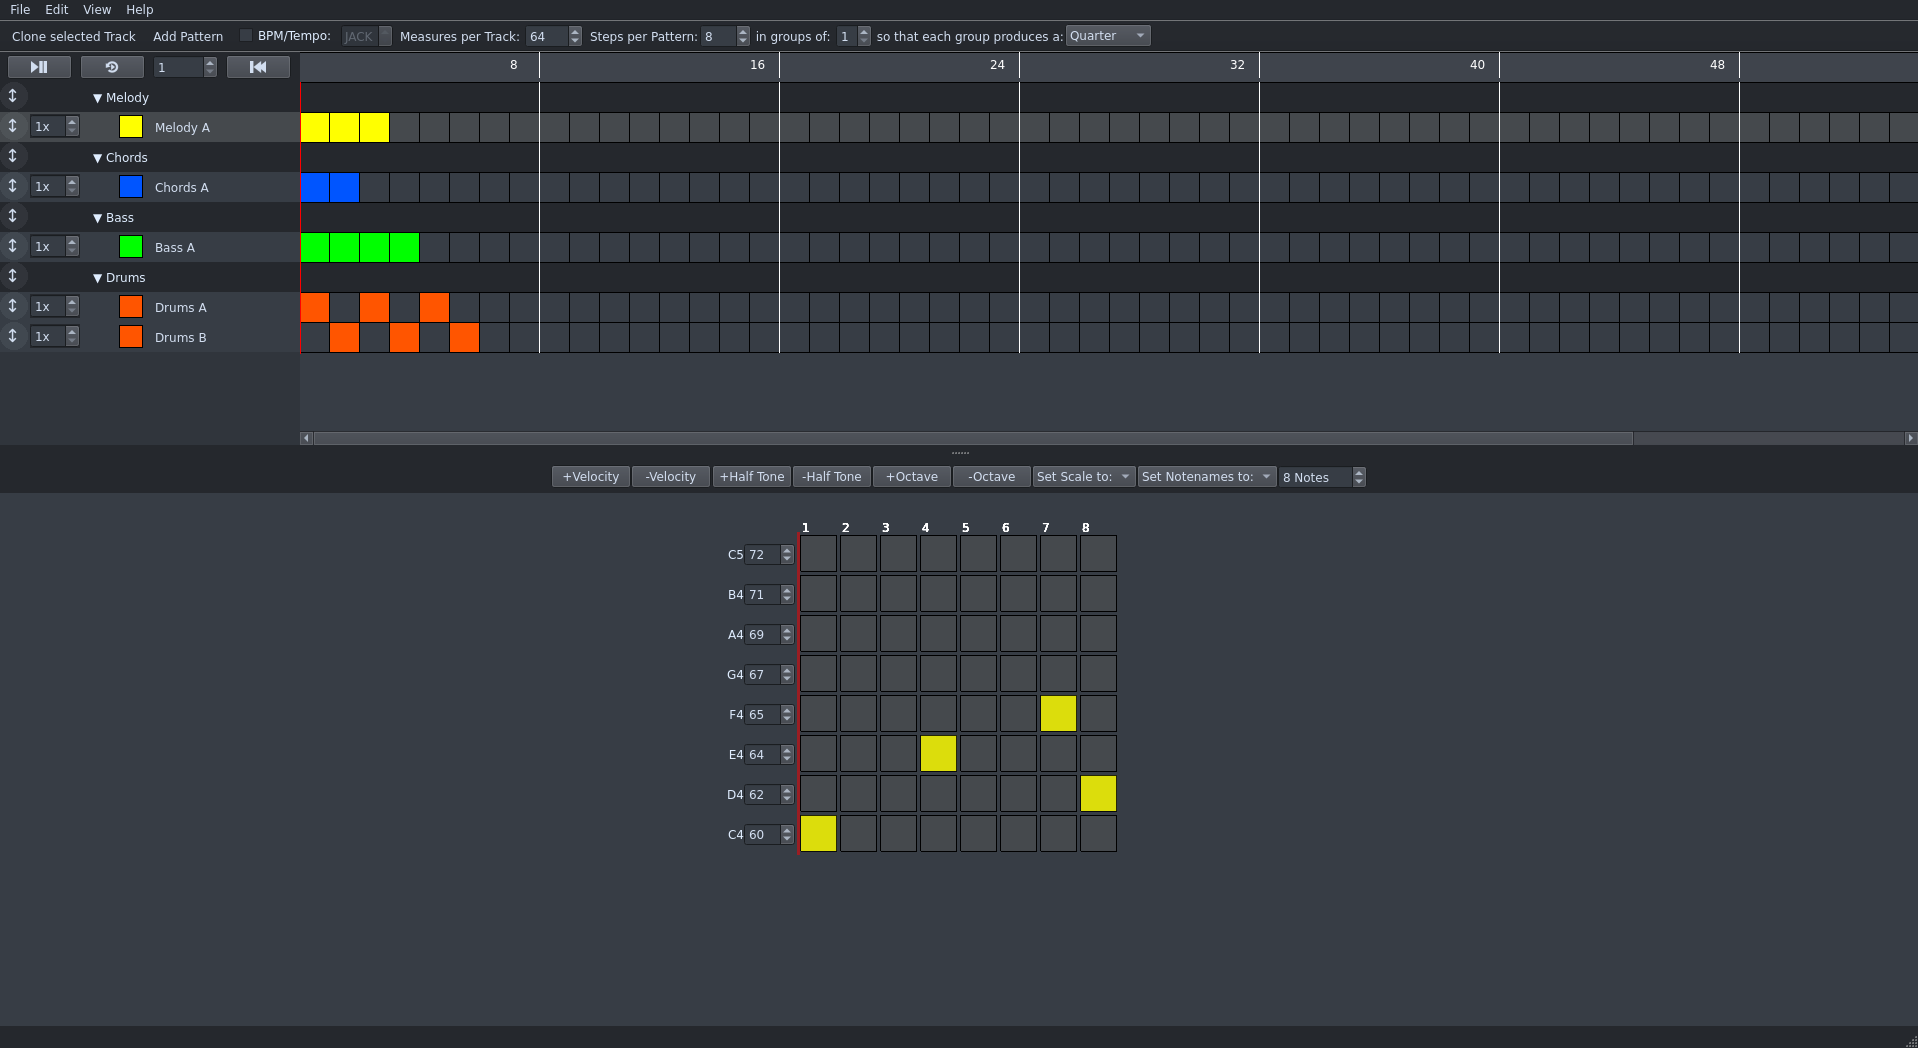
Clone Selected Track adds a new track based on the currently selected one. This is an important and often used command that is mainly used to enable variants. The cloned track is empty, but inherits the scale of the original, its average velocity or volume, color and name. If the name ends in a single letter like "A", "g" or a number, it is automatically incremented, as you can see in the screenshot. The new track automatically connects to the same JACK instrument.
Add Track adds an empty track. It is given a random name and is not connected in JACK. Scale, note-names etc. will be taken from the currently selected track.
BPM / Tempo: The tempo can be completely deactivated by unchecking the box. In this case, the "JACK Transport" system takes over, as indicated by the "JACK" logo in the deactivated input field. This allows programs running in parallel to create complex tempo sequences, which is not possible in Patroneo alone. If the checkbox is activated, the specified tempo is considered to be beats per minute. A "beat" is the selected note value of the list. More on that later.
Measures per Track controls the total length of the piece, whereby the absolute number of seconds can change depending on how the tempo is selected and how long a measure should be. If the number of measures is reduced, no measures are actually deleted, but just ignored. If you later set the number of measures higher again, you will get your old configuration back. Patroneo nevers stops playback on its own. Especially in a JACK-transport environment it will continue playing even after its own end.
Steps per Pattern, in groups of … so that each group produces a … note. Here you can set how long the patterns are and what grouping below the beat they have. This is the most complicated part in Patroneo and will be discussed later in this manual. For now it is recommended to ignore the "groups" field. Steps per Pattern is simply the number of tones that can be switched on and off. The drop down list selects how long each of these steps is.
Playback Controls are three buttons. From left to right:
-
Play / Pause. Press to play or pause the music at the current location. You can also press the space bar.
-
Loop on and off. The currently played measure (in all tracks) is continuously repeated. This function is suitable for working in a certain place by getting to hear your changes quickly. The loop is broken up by pressing the button again or jumping around in the timeline.
-
To the start: Jumps back to the beginning, whether the music is playing or not.
The duration of the loop in measures can be set next to the loop button. As a reminder, the loop is a function to try out ideas while composing. It is not suitable, both technically and in terms of user interface, to be changed spontaneously during a live performance or recording, or during a recording session.
2.1.1. Swing
Swing (also called shuffle) can be adjusted by a slider in percent. The slider is located on the far right of the toolbar. The slider is only visible when the group (see above) is set to either 2 or 4. Swing is also only applied in these groupings.
The start value is 0% and means: no swing; in a pair of notes both are of equal length. By changing the value, you can lengthen the first note of each pair and shorten the second. Which amount you like should be decided by listening.
The swing value has a very different effect, depending on whether a grouping of 2 or 4 notes is selected. For example with a grouping of 2, 40% is a moderate value, as experienced in Jazz. With a grouping of 4 (same BPM/tempo) already 15% are clearly audible.
2.2. Form Editor
In the Form Editor you create the structure of a piece. To do this, the measures in each track can be switched on and off as desired. One can imagine, for example, a drum set that plays three bars in a row and makes a "break" every fourth bar. For this common drum technique you need two tracks. In the screenshot this "3+1" pattern can be seen in the third section (bars 17 to 24) in the orange bass track.
Whole parts (e.g. verse and chorus) are implemented by using different tracks. To make the creation of related tracks as comfortable as possible, the "clone" command exists.
It is possible to zoom in on the measures. To do this, hold down the CTRL key and turn the mouse wheel up or down. Please make sure that the mouse cursor is actually over the measures and not over the track names or on the timeline.
Timeline: a click with the left mouse button sets the playback position, even during playback. In addition, the measure groups (not to be confused with grouping in the pattern) can be seen and set here. If you hover over the timeline with the mouse cursor, you can reduce or increase the size of the groups with the mouse wheel. The groups not only have an cosmetical function but are also used as units of measurement if you want to delete or add entire ranges.
Track Names. Here you can move tracks, rename them, give them a different color and more:
-
A single click with the left mouse button on a name selects a track without changing anything. This is the best way to just look at a track. (A click on the measure area changes a measure immediately!)
-
The double arrow on the far left can be used to move tracks up and down to organize them. It has no effect on the sound or the JACK connections. To move, click on the arrow with the left mouse button, hold it down and move the mouse up and down.
-
The colored square shows the current color. A left mouse click opens a dialog.
-
Track names can be changed at any time by a double-clicking with the left mouse button. Press the Return key to finish renaming. The JACK connection is retained when renaming. It is a good habit to end tracks on a single letter or number. These are used in "cloning" to construct a variant of the name. See the screenshot above.
-
A click with the right mouse button on a name opens the context menu of a track. Here you can
-
Switch all measures on or off (only applies to the visible measures)
-
Invert the activated measures: Off becomes On and vice versa.
-
Clone this track (same function as in the toolbar)
-
Delete the track permanently and irreversibly
-
Copy the measure sequence of another track onto the selected one. Measures that have already been set are preserved. If you use this function from an empty track you will practically get "copy track".
-
Now finally the Track itself. A left click on a measure switches it on or off again. You can switch several measures in a row on and off by holding down the left mouse button after clicking and moving the mouse left or right. A right click on a specific measure opens a context menu: Insert new measures in all tracks(!) at this position or delete measures from all tracks. The number of measures results from the current measure group setting from the time line.
These functions are especially understandable if you apply them to the first measure of a group (after the white line). This allows you to insert new "parts" or delete an entire part.
A good method is also to change the group size for these functions briefly and then reset them immediately afterwards.
2.2.1. Measure Modifications: Transposition and Rhythm
The following functions can be looked up in the Edit menu at any time, but cannot be invoked directly from there, but require the use of keyboard and mouse at the same time. Use the keys while hovering the mouse pointer over a measure in the track editor (upper half of the screen).
For each of the following four possibilities there is a separate key to increase a value (e.g. semitones) or, together with the shift key, to decrease the value.
In the measures themselves, there is a small lettering that shows the current values. There is graphically only space for 3 of 4 modifications, but this is not a limitation in practice.
The modifications always apply to an individual bar and are not visible in the pattern (lower part of the screen). If the bar is switched off (and on again), the modification is deleted.
Halftone transposition
Halftone transposition (H / Shift+H) changes all notes in this individual bar by e.g. +5h, that is five semitones upwards: C becomes F, MIDI note 60 becomes 65. -7h is a fifth downwards.
The scale transposition is calculated first and then the semitone transposition.
Scale transposition
Scale transposition (S / Shift+S) raises, or lowers, everything to the notes that follow next in the respective scale.
One can imagine that the steps in the pattern are shifted up or down in the rows behind the scenes. Whatever tone is set in this row gets played. With a normal scale, this is musically easy to understand: The tones are moved up or down in the scale.
However, if the scale is chosen freely, there are non-intuitive outcomes; "up and down" with respect to pitches may lose their meaning. It is possible to use two interleaved scales in the pattern and to switch between them by scale transposition +1. Or even uses completely different tones, so that only the rhythm remains the same.
The scale transposition is calculated first and then the semitone transposition.
Step delay
Step delay (D / Shift+D) makes all notes of the bar sound earlier or later than they are created in the pattern itself. The rhythmic consequence is determined by the time signature and subgrouping of the track. Example: If the step delay is set to "2", a tone in column 3 will not sound until column 5. Negative values move them earlier accordingly.
Tones that would sound earlier than 0 or would be shifted behind the end of the bar are ignored at first. But if you activate "Step delay wrap-around" in the context menu (right click) of the track, these tones are moved to the beginning or end of the bar, like on a cylinder, whose end is followed by the beginning again.
The step delay is calculated first and then the augmentation factor.
Augmentation factor
The augmentation factor (A / Shift+A) doubles (x2, x4, x8, x16 …) or halves (quarters, eighths …) all note lengths of the bar. Subsequent notes are played earlier or later as a result. Augmentation means lengthening and diminution means shortening all note values by a factor.
Tones that would sound earlier than 0 or would be shifted to the end of the bar are ignored at first. But if you switch on "Repeat diminuated patterns in itself" in the context menu (right click) of the track, a halved bar is played twice in quick succession, a quartered bar four times in quick succession and so on. This setting has no effect on augmented bars.
The step delay is calculated first and then the augmentation factor.
2.2.2. Track Groups
Tracks can be grouped together. This is not to be confused with the rhythm groups of patters.
Groups have two functions: they improve the clarity of layout and group JACK midiports together. (All tracks in a group send via the same port).
Typically, groups are used to combine individual tracks into "logical instruments". It is highly recommended to use groups, that’s why the empty Patroneo project is already set up that way.
Double-clicking on the name of the group "opens" and "closes" it, which has no effect on the music, but is purely visual.
Groups can be moved by using their arrow symbol located on the far left (hold down the left mouse button and drag up or down), just like the individual tracks. The order of tracks within the group is also arbitrary.
Groups and individual tracks can be mixed in any order.
All options and functions for track groups can be accesesd via the context menu of a track (right mouse click):
-
Tracks can be added to, moved to or removed from existing groups at any time.
-
A track can be moved into a newly created group, which can be given a name immediately.
-
If a track is removed from a group, it becomes a standalone one again.
-
If a track is cloned, it is in the same group as the original.
-
New, empty tracks (those with random numbers as names) are initially not assigned to a group.
-
Groups cannot be renamed.
2.2.3. Extending Measure Lengths of Individual Tracks
At first, all measures of all tracks are of the same length in Patroneo, namely as you have set the steps per pattern (start value: 8).
To the left of the track name is a number field for the "measure multiplier". The start value is "1x". If you increase this value, one measure of this track will be x times longer from now on. The measure grid changes accordingly and a click now activates the longer measure.
The pattern in the lower part of the screen will be longer, so you have more space to compose. compose.
Placing a long measure follows the old grid. You can only switch on a bar every x bars (multiples of the set value) to place a measure.
A halving of the measure lengths or crooked multipliers (1,4) are not possible (only whole numbers).
2.2.4. MIDI-Channel
The MIDI channel a track transmits on can be set via the context menu of a track (right click). The start value is Channel 1. Only one channel per track is possible at a time. For more demanding scenarios, external JACK programs must be used.
2.3. Pattern Editor
The Pattern Editor is used for composing. The tones, also called "steps", are used to form a measure. The pattern is exactly as long as a measure and is played from left to right. There are several possibilities for tonal arrangement, which are now explained.
The pattern is always as long as set in the toolbar. Steps that have been set are never deleted by rezising! If you make the measures shorter, tones "too far to the right" are simply ignored. You can see them again as soon as you make the measures longer again.
If the pattern is larger than the screen you can either use the scroll bars or zoom. To zoom hold down the CTRL key and turn the mouse wheel up or down.
At the top you can see a label for the Active Track.
The pattern itself is arranged in rows and columns. The rows symbolise the (adjustable) pitches, the columns show their rhythmic sequence and position in time.
2.3.1. Pattern Context Menu
A right click on a step opens a context menu that provides the following exclusive functions. For all functions that reverse or invert ("On" becomes "Off" and vice versa), please note that all volume information (see below) is lost.
"Row" here refer to all steps of the same pitch. From left to right.
-
Invert row (an empty row is completely filled)
-
Clear row
-
Repeat to here to fill row (see below)
-
Invert Steps (the whole pattern)
-
All Steps On
-
All Steps Off
The function "Repeat to here to fill row" opens up many creative possibilities: All steps from the beginning of the row to the selected one (incl.) are taken as a "sub-pattern" which is used to fill the rest of the row. All existing steps will be deleted with their volumes.
For example, if you want a note every fourth step, activate the first step of the row, leave three empty and click on the fourth step as context menu and select the fill function. The whole row will now be a recurring pattern of "X o o o X o o o…".
2.3.2. Duration and Volume
A Step is a grey or coloured box. Grey means pause, coloured means Sounding Tone. A click with the left mouse button switches the steps on and off. A right click opens the context menu. Here you can switch all (currently visible) steps on, off or invert all: Off On becomes Off and vice versa. All volume information (see below) will be lost.
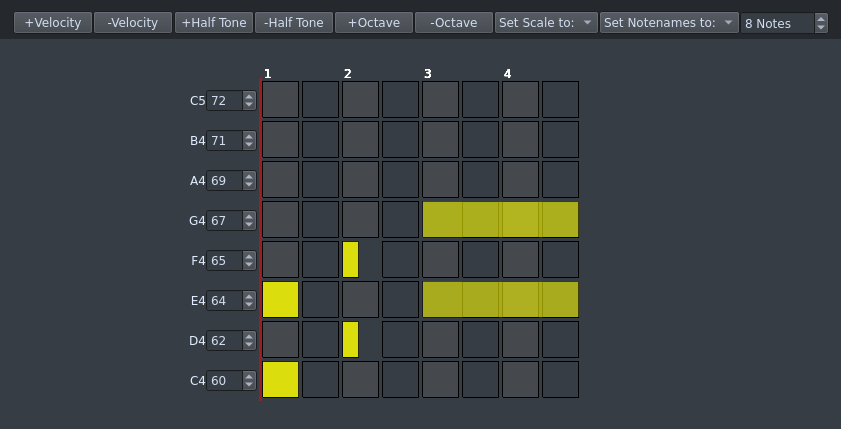
All steps are equal length. Other Durations are also possible: If you hold down the left mouse button after activating a step, you can shorten or lengthen the tone by moving it to the left or right. It must be at least half the length. A tone is at most as long as the measure itself.
You can activate as many steps in a row or simultaneously as you like. Thus Chords can be built.
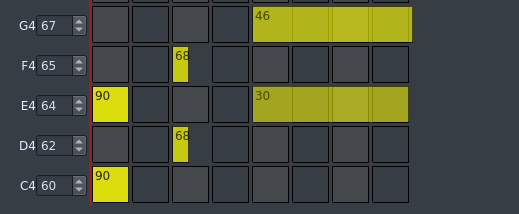
Steps can have different Volumes. For this Patroneo uses so-called MIDI Velocity. If you hold the mouse cursor over an activated step, you can make its sound softer or louder by turning the mouse wheel. The volumes are displayed as numbers between 0 and 127.
If you want to see all the volume levels at once, hover the mouse cursor over one of the two volume buttons in the menu in the middle of the screen. There is also a setting in the "View" menu to display the numbers permanently. Additionaly a step looks more transparent the quieter it is. If the step is switched on and off, the volume is set back to the normal value, derived from the average volume of all tones of this pattern.
You can use the Velocity buttons to make all tones of a pattern quieter or louder. If you click on it, the volume changes by 1 each, but if you hold the mouse cursor over a button and rotate your mouse wheel the velocity changes by 10 each. It doesn’t matter which velocity button (plus or minus) you hover over.
To make all tones of a row quieter or louder hold the Alt key (not AltGr) and use your mousewheel on a step of that row.
Split or subdivide notes
To split a step even further, hold the mouse cursor over an activated note and press a number key on the keyboard. Key 1 means "no split", all other keys are a subdivision e.g. 3 is splits into 3 sounding notes. All pitches are the same.
This can be used, for example, to create polyrhythmic patterns, or to divide "even" during swing. Or of course to simply have more and faster notes :)
2.3.3. Pitches and Scales
Click with the middle mouse button on a step to hear the sound it plays. This allows you to "pre-listen" before you decide to set a note. Tip: Hold down the middle mouse button and move the mouse up and down the steps.
Which actual pitch is played ("MIDI Key") is determined by the Scale. Usually these are common musical scales: seven different notes and the octave of the root note.
Such common Scales can be selected directly. For example, major, minor, various so-called "church modes" but also the blues scale or chromatic (e.g. to GM drum mapping).
If you select a scale from the list, it will be built upon the bottom row. As a rule of thumb this is also the lowest note. In the screenshot this is midi note 60 / C4, located bottom left. You must first select the root directly and then select a Scale.
There are four buttons to change the pitch of both the root note and the entire scale:
-
Half Tone Plus or minus shifts the whole scale up or down by one semitone each. This should not be confused with the temporary transposition from the form editor. This is called destructive change, since the values themselves are permanently changed.
-
Octave Plus or minus shifts directly by a whole octave. You could also press the half-tone button 12 times. Don’t.
As already described in the scale transposition, it is also possible to directly input any value between 0 and 127 in the Fields of the Scale. The tones do not have to have musically meaningful intervals, nor do they have to be sorted in ascending or descending order.
2.3.4. Changing the number of available pitches
In the toolbar in the center, next to the transposition and scale options, there is a a setting option to change the number of available pitches. The starting value is "8 notes". Possible values are 1 to 127, but these are extreme values. Normal, and tested, is 1 to about 24 (two chromatic octaves).
Changing the number applies only to the currently selected pattern. Different patterns can have different numbers of pitches.
The notes are added or taken away at the bottom. Already existing activated notes will remain, even if they become "invisible", because there is no more space for them.
2.3.5. Shadows
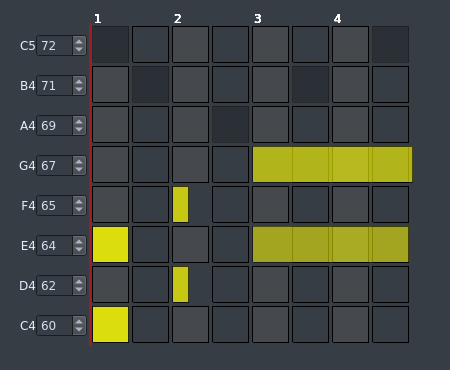
Often you want to add more tones to an existing track in a different pattern. A second voice, question/answer technique etc. To help you, it is possible to display other tracks as Shadows. Just click with the middle mouse button on the track you want to see. This is only possible in the measure area, not on the track name or on the timeline.
You can display as many shadows as you want, until you lose track. All shadows disappear as soon as the active track changes.
Shadows are just a guidance and not litereal pitches: If you choose a shadow-track with a different scale than your current one the shadow-pitches will be technically wrong. Shadows are very simple in principle. They just show which steps are marked, nothing more.
2.4. Grouping in the Pattern
Grouping is part of the time signature.
As mentioned above steps per pattern, sets the length of the pattern. Patroneo starts with 8 steps per measure for a new project (see screenshot). On the far right is a drop down list, which is set to "Quarter" for a new project. You start with a traditional 8/4 time signature.
The field in groups of allows you to group steps together, each group being as long as specified in the drop down list. This allows you to further subdivide your time signature. The "beat", i.e. the tempo, is based on the main beats, the first step of each group.
-
4/4 time signature with eights notes as smallest rhythmical unit
-
8 steps per pattern / in groups of 2 / so that each group produces a quarter
-
-
4/4 time signature subdivided as triplet eights notes (swing)
-
9 steps per pattern / in groups of 3 / so that each group produces a quarter
-
-
12/8 time signature
-
12 steps per pattern / in groups of 1 / so that each group produces an eigth
-
-
8/4 time signature subdivided as sixteenth notes
-
32 steps per pattern / in groups of 4 / so that each group produces a quarter
-
Normally, the time signature is set relatively at the beginning of a new project. However, it happens every now and then that you need smaller rhythm values than you thought at the beginning. If you simply increase the value of the grouping, you get more subdivisions, but the number of steps remains the same. Likewise, the notes remain exactly in the "column" in which they were previously placed. In other words, the music will sound different. Overall, the measure is also getting shorter, as the same number of steps is now assigned shorter note values.
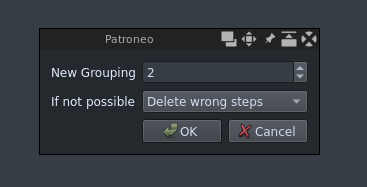
Patroneo therefore offers the function Convert Grouping (in the Edit menu) to change the existing measure structure and to resize steps already set so that the music sounds the same.
If you click on the button in the toolbar, a small dialog box opens in which you can enter the desired grouping. It is also possible to set what should happen if the conversion would not work properly for musical reasons (see below).
Conversion is often possible without any problems:
-
If the grouping of
1is set to a higher value, it always works -
If the grouping is set from
2to4it always works
For all other transformations it depends on whether the existing tones lie between the new grid after the conversion or not. The former case is not possible and you have to decide:
-
Do nothing (default)
-
The operation is aborted, everything remains as before.
-
-
Delete wrong steps
-
Anything that would appear between the grid will be deleted or discarded.
-
-
Merge wrong steps
-
Impossible positions are moved to the next possible position. In any case, this means that the music now sounds different. Usually several notes are pushed on top of each other and form chords.
-
With a little experience you will be able to estimate what error handling you need.
2.5. Miscellaneous
2.5.1. Global rhythm offset
In the Edit menu you will find the Global Rhythm Offset. In modular music production with several programs, synchronised by JACK transport, Patroneo can be shifted entirely backwards (or even forwards) on the timeline.
For example, a performance is conceivable and the Patroneo song should only start at 52:00. Or you want to make a bar- and rhythmless intro in another program, which lasts exactly XY miditicks.
This command is explicitly aimed at advanced users and is documented in detail in the application itself when you use the menu command.
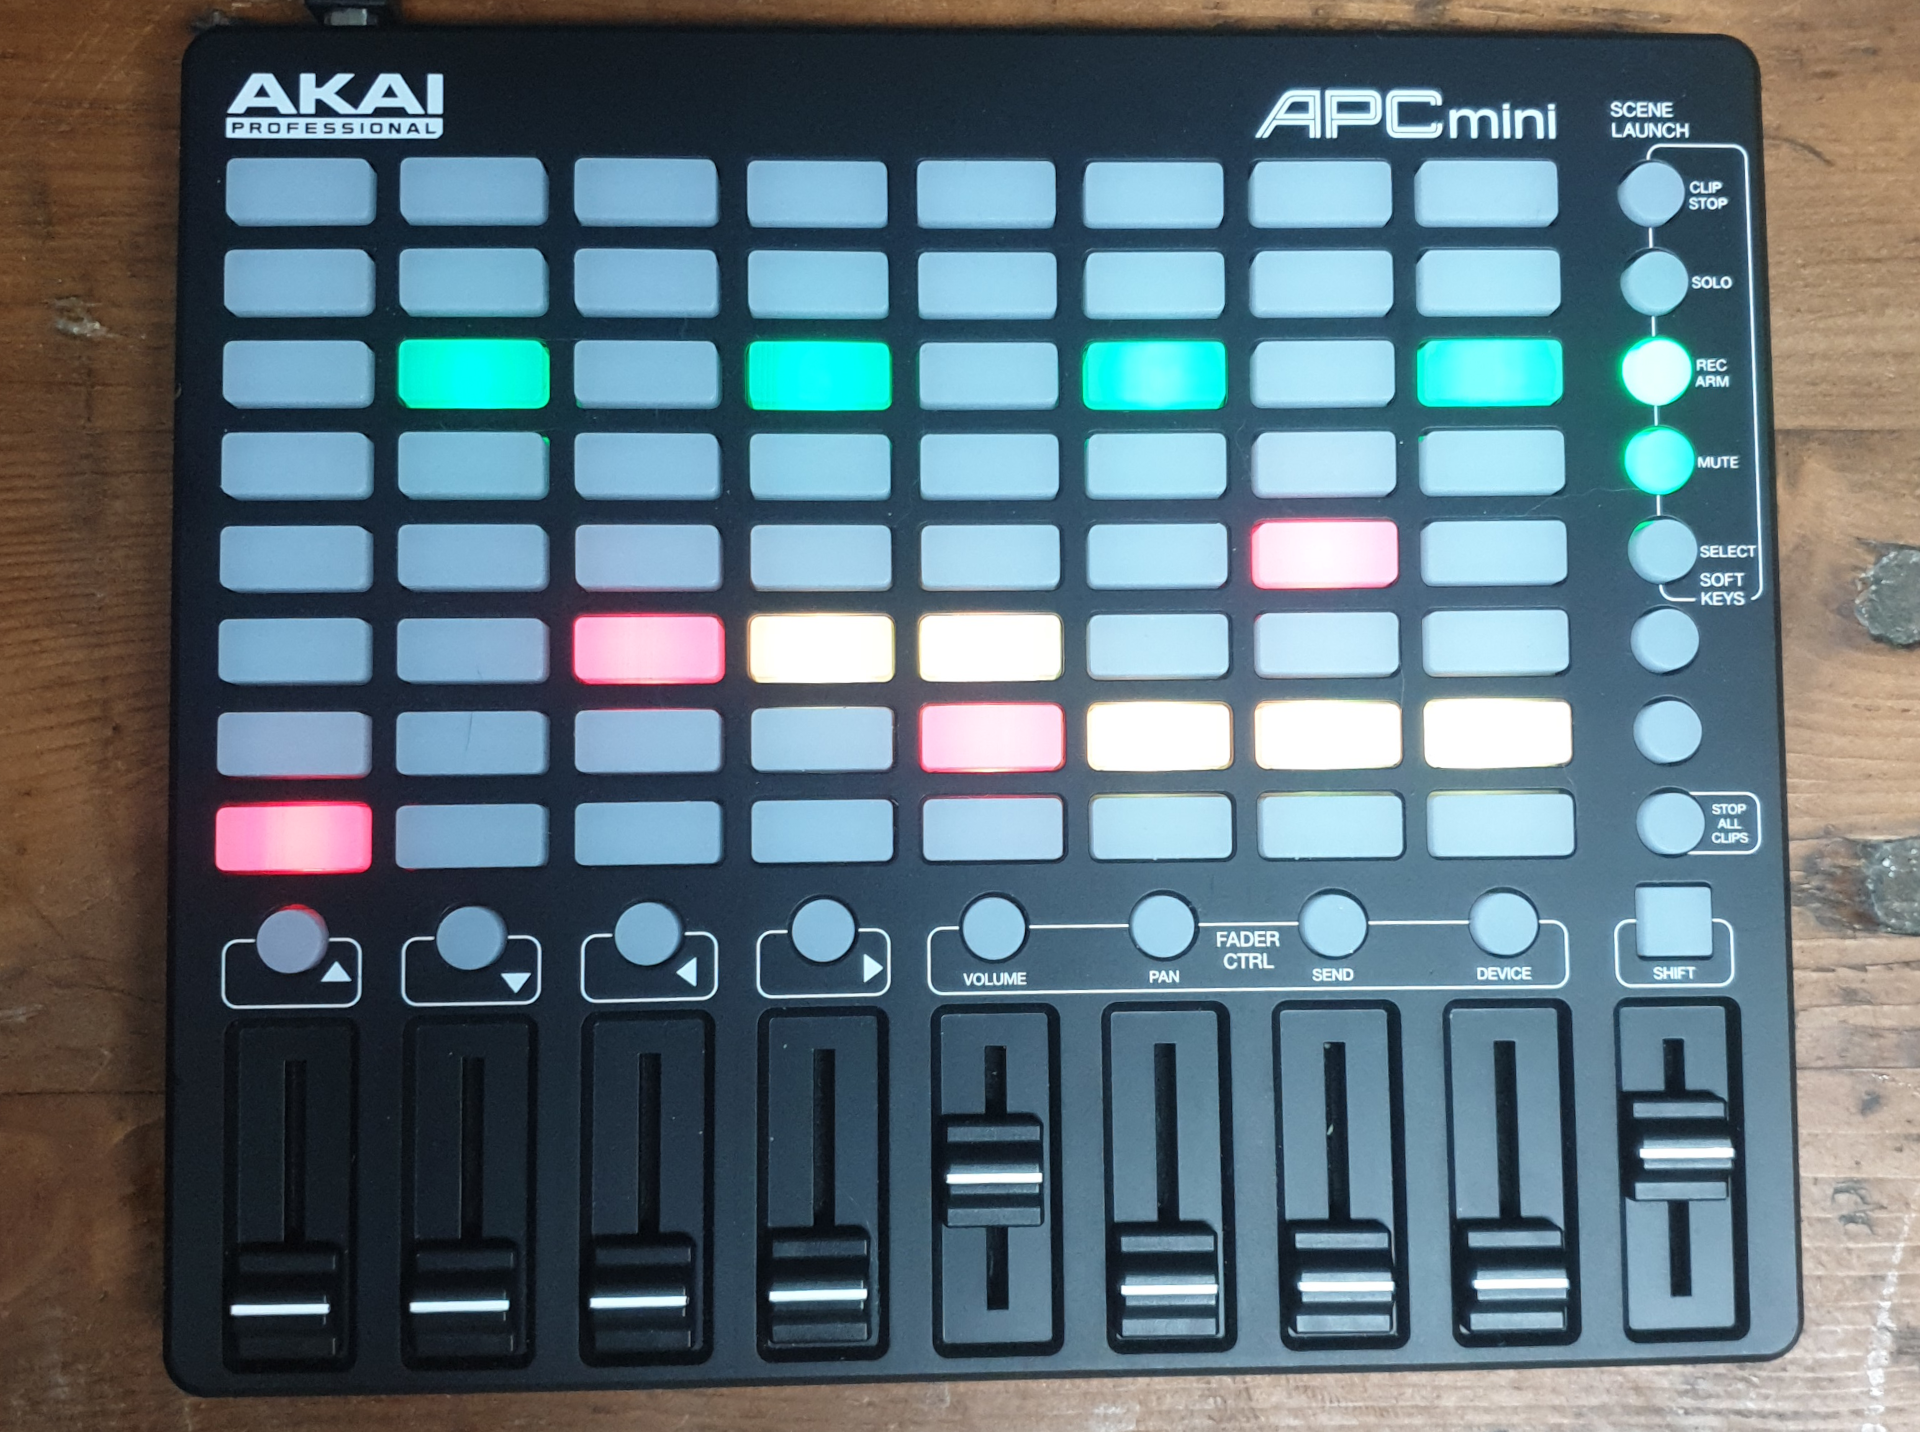
2.5.2. Hardware: AKAI APCmini
The AKAI APCmini can be used as an input device. Patroneo has a JACK-Midi input and output port for this purpose: once for the actual input and then back to the unit to control its LEDs.
For an actual tutorial how to use the hardware please refer to the video in our series of video tutorials (see introduction of this manual).
It may seem strange that this is only offered for one specific device. You may even wonder if you should buy this device yourself now?
No, don’t buy it. Working on the computer itself is faster and more convenient.
The author tried it out as an experiment. The APCmini was the cheapest device of this kind (69€ as of 2021) with at least 8 by 8 buttons (standard layout of the Patroneo pattern). There are no plans to buy more devices of this kind, so there will be no software support.
In Patroneo, you can only do pattern input with the APCmini. Everything that has to do with tracks, as well as measure modifications (transposition etc.), the selection of the scale, time signature and grouping etc. must still be done on the computer. And even then, the handling of volume/velocity is inconvenient and tone lengths cannot be adjusted as finely.
Once the programming was done, however, it was not worth leaving the functionality out of the program. After all, it is Patroneo’s only remote control from the outside, which can perhaps be "abused" for other creative purposes at some point.
3. Installation and Start
Patroneo is exclusive for Linux. The best way to install is to use your package manager. If it is not there, or only in an outdated version, please ask your Linux distribution to provide a recent version.
If available in the package repository, please continue reading directly at "Start patroneo from Agordejo / New Session Manager". If not, you can build Patroneo yourself.
-
Please check the supplied README.md for dependencies.
-
You can download a release or clone the git version
-
Download the latest version from https://www.laborejo.org/downloads and extract it.
-
-
Change into the new directory and use these commands:
-
./configure --prefix=/usr-
The default prefix is /usr/local
-
-
make -
sudo make install
-
Run
agordejo -
Press the
Newbutton, and enter a name for your piece of music. -
Use the launcher to add
patroneoto the session. -
Add any compatible programs, e.g. synthesizers.
Please read README.md for other ways of starting patroneo, which are impractical for actual use but can be helpful for testing and development.
4. Help and Development
You can help Patroneo in several ways: Testing and reporting errors, translating, marketing, support, programming and more.
4.1. Testing and Reporting Errors
If you find a bug in the program (or it runs too slow) please contact us in a way that suits you best. We are thankful for any help.
-
Report bugs and issues: https://www.laborejo.org/bugs
-
Website: https://www.laborejo.org
-
E-Mail: info@laborejo.org
-
If you see the opportunity and know that a developer will read it also forums, social media etc..
4.2. Programming
If you want to do some programming and don’t know where to start please get in contact with us directly. The short version is: clone the git, change the code, create a git patch or point me to your public git.
4.3. Translations
Patroneo is very easy to translate with the help of the Qt-Toolchain, without any need for programming. The easiest way is to contact the developers and they will setup the new language.
However, here are the complete instructions for doing a translation completely on your own and integrating it into the program. The program is split in two parts. A shared "template" between the Laborejo Software Suite and the actual program.
The process is the same for both parts, but needs to be done in different directories:
template/qtgui and plain /qtgui, relative to the root directory, where the patroneo executable is.
Everytime you see "template/qtgui" below you can substitute that with just "qtgui" to translate the other part of Patroneo.
You can add a new language like this:
-
Open a terminal and navigate to template/qtgui/resources/translations
-
Edit the file
config.prowith a text editor-
Append the name of your language in the last line, in the form
XY.ts, where XY is the language code. -
Make sure to leave a space between the individual languages entries.
-
-
Run
sh update.shin the same directory-
The program has now generated a new
.tsfile in the same directory.
-
-
Start Qt Linguist with
linguist-qt5(may be named differently) and open your newly generated file -
Select your "Target Language" and use the program to create a translation
-
Send us the
.tsfile, such as by e-mail to info@laborejo.org
You can also incorporate the translation into Patroneo for testing purposes. This requires rudimentary Python knowledge.
-
Run the "Release" option in QtLinguists "File" menu. It creates a
.qmfile in the same directory as your.tsfile. -
Edit
template/qtgui/resources/resources.qrcand duplicate the line<file>translations/de.qm</file>but change it to your new .qm file. -
run
sh buildresources.sh -
Edit
engine/config.py: add your language to the line that begins with "supportedLanguages" like this:{"German": "de.qm", "Esperanto: "eo.qm"}-
To find out your language string (German, Esperanto etc.) open the
python3interpreter in a terminal and run the following command: -
from PyQt5 import QtCore;QtCore.QLocale().languageToString(QtCore.QLocale().language())
-
To test the new translation you can either run the program normally, if your system is set to that language. Alternatively start patroneo via the terminal:
-
LANGUAGE=de_DE.UTF-8 ./patroneo -V --save /dev/null
